Showing posts with label Computer. Show all posts


Every Computer user has a digital management system like some rules and a way to arrange all data in his/her computer.
Store movies & pictures in different drive at different folders or storing songs in different folders with names like old songs, new songs & many more..

They manage their computer to make it more beautiful, attractive and easily accessible.


Use of normal tricks like wallpaper, fonts, changing the location of task bar and themes are common, some intelligent user use special gadgets like object doc, weather clock, some flash characters to decorate their desktop and many of them have a dream to change the dummy logon windows screen but they don’t.

I know this because I am also one of them after trying manually and many other software finally I found a cool application that allows you to change your logon screen.


You can download from here: DOWNLOAD

Web Site: http://www.danielnetsoftware.com/


Follow Steps:

Step 1: Install It!!
Simple as other normal Software.
Ones your installation is completed.


Step 2: Start Logon Screen from start menu or right click on your desktop & select Logon Screen.

Logon Screen

Step 3: Browse any image and press ok.
You can reset to default screen any time you want using Restore button.
Use Lock button to lock your screen.


Step 4: You can randomly select any image without starting Logon Screen software and right click on it and select Set Logon Background from list.

Set as logon background


As you select Set as logon background system will ask you for your permission, allow it.

After that you will receive a message!!

Congratulation!!


Just Check by Lock your Screen!!


Features:

*Support any size of image
*Provide simple options
*Support JPEG, PNG etc.
*For Free


Hope this will help you to create a good impression over others.
Help me to make my blog more better just type your comments.

Thanks!!

Installing new Language in Windows 7


We are almost addicted to use computers or laptops in English and it’s really difficult to operate it in a native language and is a fun too.
Some of may be using computer in other languages than English because they know how to install other languages into their Computers.

This article helps you in how to find your native language and how to customize & Install it into your computer.
How to modify your Welcome & Login Screen with your Native language or any other language you want.
You just need to follow step by step instructions. This article is design with keeping in mind that many of our readers are new learners of computer.

“If you really find fun in learning, exploring & sharing knowledge about computer than this blog is one of good place for you to fulfill your thrust”.

Before we start, just check some information about your system
Like your Operating System type: 32Bit or 64 Bit Operating System.
If you don’t know than just follow me…
Go to start menu-> Right click on Computer and properties.
At System You will find your Operating System type.


Language Package:

Go to the Below link for Downloading Language Package

Click Here!!(http://windows.microsoft.com/en-IN/windows/language-packs#lptabs=win7)

#Select your Language and Press Get it!!
#Press Download
#select your operating system type as 32-Bit or 64-Bit
#Press Download

As Download Completed Copy that file and place it at Desktop.
Here I am Using Hindi Language package 32-Bit.
Now we are ready to install it.

Step 1: Go to Start Menu-> Control Panel


Step 2: Find Region and Language Click on it.


Step 3: A pop-up menu appears then select Keyboard and Languages.


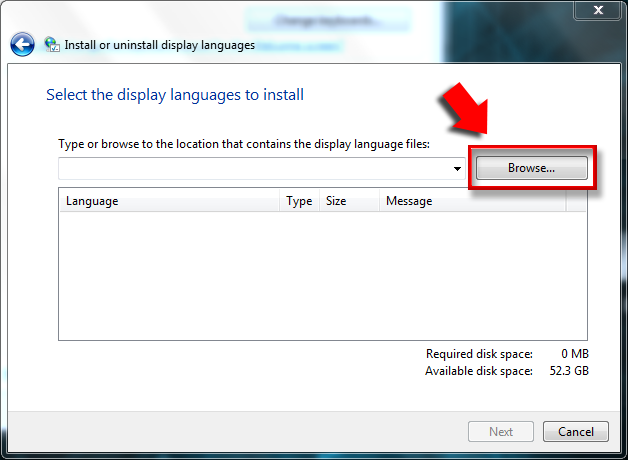
Step 4: In Display Language section Press Install/Uninstall Languages Button.
[ If your system has some more preinstalled languages other than English than it will be listed as Choose a display language.]

Step 5: Select Install display languages.


then


Selection 1: Use windows Updater to download & Install, May be start downloading all other files to or it can be a time taking process.

Selection 2: Browse Computer or Network for Downloaded Language Package.

Step 6: Browse Computer or Network.


#Select Desktop
#Select Language Package


#press Next.

Step 7: Select I accept license terms and Next .
#At Language Interface pack Readme file press Next.


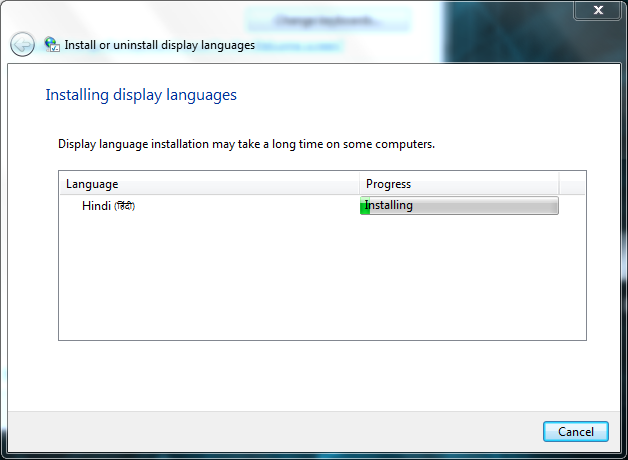
Installation Start!!

Step 8: On Installation Complete press Next.


Step 9:On Select Display language


#Select language you want to be your Display language
Option 1: Select this only if you want your Welcome & Login screen also in the same language.
#press Change Display language

Step 10: System will ask you for restart.

#save your all unsaved other data
Now press Restart now.

After restart you find your system in new language.


Now Enjoy your computer in your language Exploring system is Fun. If you have any query or suggestion please feel free to write me….


You may have some questions in your mind like
How to hide files or folders?
How to unhide files or folders?
How to show hidden folders?
How to view hidden files?
How to permanently unhide files?
Then you are at right place…

Most of Desktop, Laptop & mobile phone users like to keep some private folder/files hidden so that other people can’t find it easily and some malicious people & programs also like the same.

Files & Folders are two most common words among computer users. In general we use at least 15-20 different kinds of files like .txt, .jpeg, .mpg,.mp3, .mov and many more.

Files and Folders in our system are mainly create in 3 ways:
1.By Operating System
2.By User
3.By some malicious program or virus.

Our operating system assign some properties (attributes) to every file or folder created by any of above mentioned ways.

That helps Operating system in managing & handling of files.

File properties (attributes) are:
1.Name of File
2.Type of file
3.Location of file
4.Size of file
5.Date of Creation & Modification
6.File Visibility (Hidden/Visible )
7.Creator information.
8.Read/Write permission

Now, from all above properties we are interested in hiding & un-hiding files only.
And it’s too simple to do that just follow few quick steps:
[You can hide any particular file or any folder that contain many files]
Step 1: Just select & right click on that folder/file.


Step2: go to properties.

Step 3: in general

#Check Hidden box for making File or folder Hidden.
If you are hiding a Folder than you may receive a confirmation message

Like:
Select 1: If you want to hid only that folder.
Select 2: If you want to hide folder and its containing files & folders too.

Sometime even after that your file may be visible to all the users because user system folder option is at show all folders.
Note: If your folder or file is not visible no need to follow next steps.

Step 4: Go to organize at right corner & select folder option.


Step 5: Select View in Folder option.


Step 6: Scroll down at Hidden files and folders.


Now Select option
1.Don’t Show hidden files, folders or Drive-OFF
2.Apply
3.Ok.

Now your file is completely hidden.
Feeling good!!
But main problem begins now,
When you try to find your folders or How to find hidden files or folders if they are not visible to you also?

#If you have hide a folder with select 1 at step 3 & you remember the folder/file name.
Means only outer folder is hidden not internal folders are than you can use this short cut to access your files.
Go to the folder directory means the place where you hide the file.
Now, go to address bar and just type folder name & press enter.
Wow!!
You got the file open!!
The reason behind that is you have only hide the external folder not the internals, But if you select 2 at step 3 you are not able to access files with that short cut.

# Use the search box to find that folder or its contents means internal file names you may able to access them.


How to Unhide hidden files?


Step 1:Open my computer & Go to Organize.
Step 2:Select Folder Option and Go to View.

Step 3:At Hidden files and folders


Select 1. Show hidden files, folders, and drives-ON.
Note: Keep check always
Hide Protected Operating System files (Recommended)-ON
Select 2: Apply
Select 3: Ok.
Now your all hidden files become visible.

And for making file permanently visible:
#Right click on folder
#Go to Properties

#Uncheck Hidden
Now your file is permanently visible to all.

But in case if your files are still not visible that means your system is infected by some kind of virus or maybe you forget to apply & press Ok!! so check it back.
If they are still hidden you need to Use Command prompt to unhide them


Hope you find the solution for your problem and if you have any information or suggestion to add on it please inform me…..

Free Bootable Windows 7 Pen Drive

It’s an irritating and disturbing situation when you find your computer or laptop is not working properly and has some problems that may lead to Damage of any data or system crash!!
And you know that problem and you can fix that too. So you started the process of rebuilding the operating system,
Inserted the Windows 7 bootable disk and wait for option!!!
Selected Load From CD-DVD Drive!!
After Few second…..
Your System reply:  Insert a bootable Media!!
Or your Older Window 7 started Booting!!
After doing the same thing with all of your windows DVDs you realize that your DVD drive is also not working!!!!!
Now you have two more options to do:

1.Use UBS bootable Drive
2.LAN Bootable

Many people don’t have their laptops in any kind of LAN which allow you to format your system.
So last option is USB Bootable Drive But unfortunately you don’t know how to build that too. So you call a Friend and ask for a help and started searching Over Google and Got tones of ways but don’t know which one is more better and secure.
So here I am sharing one of the simple and secure ways of building a LifeTime bootable Device.
Why UBS Bootable Devices are more Better Than CD-DVD

Feature
CD-DVD
USB-Bootable
Time For Rebuilding
It takes 40-45 Minutes(approx)
It take 20-35 Minutes (approx)
Power Consumption
More Power
Very Less power
Usability
20 to 3o times
LifTime

Now Lets start How to Build a Fast USB-Bootable Drive.
Requirement : For that you need
1.  A laptop with working DVD-Drive
2.  A Pen Drive 4 GB ( Blank ) or More.
3.  A Windows 7 Disk.
4.  Administrator Access of Laptop.


Step 1:Insert Your Pen Drive and Start Command Prompt.


Step 2: On Command Prompt
Suppose you have Current Working Directory
Like
C:\User\pawerb>
So type=>  diskpart
C:\User\powerb>diskpart
And Press Enter.


Step 3: System will ask you for permition.
Allow it.
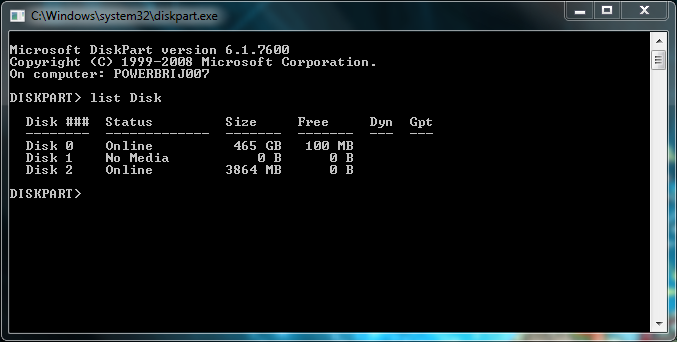
A new Command prompt will be on your screen with DISKPART Version and Your Computer Name.

Step 4: on DISKPART type commands as
DISKPART>list Disk
And press Enter Remember the space between list and Disk along with Case.
It will show all of the Disk in & connected with system.
Note: Write down disk no. of your pendrive here "Disk 2" for further Use.

Step 5: Now on DISKPART type
DISKPART>select Disk 2
And Press Enter Remember the space between select, Disk and 2.
You will get a message Like
Disk 2 is now the Selected Disk.


Step 6: Now on DISKPART type
 DISKPART>clean
You will get a message:
Diskpart succeeded in cleaning the disk.


Step 7: on DISKPART type
DISKPART>create partition primary
You will get a message:
Diskpart succeeded in creating the specific partition.


Step 8: on DISKPART
DISKPART>select partition 1
You will get a new message :
Partition 1 is now the selected partition.


Step 9: on DISKPART
DISKPART>active
You will get a new message :
DiskPart marked the current partition as active.


Step 10: on DISKPART
DISKPART>assign
You will get a new message :
DiskPart successfully assigned the letter or mount point.
And Format Disk menu popup allow system to format your pen Drive.
After that Close Disk part as
DISKPART>exit


Step 11: Insert your Windows 7 Disk into CD-DVD Drive.
Let you have your CD-DVD Drive as (Drive Letter):  F
And your pen Drive (Drive Letter): G
Now on command prompt
C:\User\powerb> F:
And press Enter, Now you are at

F:\>
F:\>cd boot
F:\boot>bootsect.exe\nt60  G:

It will update your pen Drive with BOOTMGR.

Now open your Windows 7 Disk and copy all the files and paste it into pen Drive.
Wait till completion of Copying.
Then Close the command prompt and your Bootable Pen Drive is READY!! To use.

Now real trick is here : ones you rebuild your system you want to reuse your pen drive and for that you need to Format it. But in case in future if you need that again, than you need to do the whole process again.
To avoid this you can do one thing just copy that pen Drive complete data and zip it. when ever you need just extract and copy all system files of Windows 7 into pen drive and your Bootable pen drive is Ready again..     

I think you will able to understand each steps if you found any kind of problem please feel free to ask on Comment.