Bootable Windows 7 Pen Drive For LifeTime
Free Bootable Windows 7 Pen Drive
It’s an irritating and disturbing situation when you
find your computer or laptop is not working properly and has some problems that
may lead to Damage of any data or system crash!!
And you know that problem and you can fix that too. So
you started the process of rebuilding the operating system,
Inserted the Windows 7 bootable disk and wait for
option!!!
Selected Load From CD-DVD Drive!!
After Few second…..
Your System reply:
Insert a bootable Media!!
Or your Older Window 7 started Booting!!
After doing the same thing with all of your windows DVDs
you realize that your DVD drive is also not working!!!!!
Now you have two more options to do:
1.Use
UBS bootable Drive
2.LAN
Bootable
Many people don’t have their laptops in any kind of LAN
which allow you to format your system.
So last option is USB Bootable Drive But unfortunately you
don’t know how to build that too. So you call a Friend and ask for a help and
started searching Over Google and Got tones of ways but don’t know which one is
more better and secure.
So here I am sharing one of the simple and secure ways
of building a LifeTime bootable Device.
Why UBS Bootable Devices are more Better Than CD-DVD
Feature
|
CD-DVD
|
USB-Bootable
|
Time
For Rebuilding
|
It
takes 40-45 Minutes(approx)
|
It
take 20-35 Minutes (approx)
|
Power
Consumption
|
More
Power
|
Very
Less power
|
Usability
|
20
to 3o times
|
LifTime
|
Now Lets start How to Build a Fast USB-Bootable Drive.
Requirement : For that you need
1. A
laptop with working DVD-Drive
2. A
Pen Drive 4 GB ( Blank ) or More.
3. A
Windows 7 Disk.
4. Administrator
Access of Laptop.
Step 1:Insert Your Pen Drive and Start Command Prompt.

Step 2: On Command Prompt
Suppose you have Current Working Directory
Like
C:\User\pawerb>
So type=>
diskpart
C:\User\powerb>diskpart
And Press Enter.
Step 3: System will ask you for permition.
Allow it.
A new Command prompt will be on your screen with
DISKPART Version and Your Computer Name.
Step 4: on DISKPART type commands as
DISKPART>list Disk
And press Enter Remember the space between list and
Disk along with Case.
It will show all of the Disk in & connected with
system.
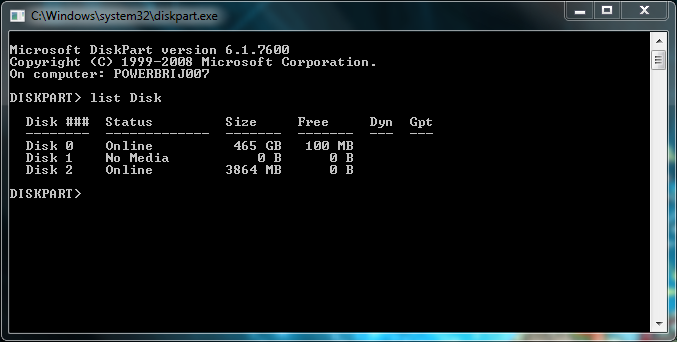
Note: Write down disk no. of your pendrive here
"Disk 2" for further Use.
Step 5: Now on DISKPART type
DISKPART>select Disk 2
And Press Enter Remember the space between select, Disk
and 2.
You will get a message Like
Disk 2 is now the Selected Disk.

Step 6: Now on DISKPART type
DISKPART>clean
You will get a message:
Diskpart succeeded in cleaning the disk.

Step 7: on DISKPART type
DISKPART>create partition primary
You will get a message:
Diskpart succeeded in creating the specific partition.

Step 8: on DISKPART
DISKPART>select partition 1
You will get a new message :
Partition 1 is now the selected partition.

Step 9: on DISKPART
DISKPART>active
You will get a new message :
DiskPart marked the current partition as active.
Step 10: on DISKPART
DISKPART>assign
You will get a new message :
DiskPart successfully assigned the letter or mount
point.
And Format Disk menu popup allow system to format your
pen Drive.

After that Close Disk part as
DISKPART>exit
Step 11: Insert your Windows 7 Disk into CD-DVD Drive.
Let you have your CD-DVD Drive as (Drive Letter): F
And your pen Drive (Drive Letter): G
Now on command prompt
C:\User\powerb> F:
And press Enter, Now you are at
F:\>
F:\>cd boot
F:\boot>bootsect.exe\nt60 G:
It will update your pen Drive with BOOTMGR.
Now open your Windows 7 Disk and copy all the files and
paste it into pen Drive.
Wait till completion of Copying.
Then Close the command prompt and your Bootable Pen
Drive is READY!! To use.
Now real trick is here : ones you rebuild your system you want to reuse your pen drive and for that you need to Format it. But in case in future if you need that again, than you need to do the whole process again.
To avoid this you can do one thing just copy that pen Drive complete data and zip it. when ever you need just extract and copy all system files of Windows 7 into pen drive and your Bootable pen drive is Ready again..
I think you will able to understand each steps if you
found any kind of problem please feel free to ask on Comment.


0 comments :
Post a Comment